![]()
![]()
![]()
Please also see my BC Coilover Page for your suspension needs.
RBryant Motorsports BC Coilovers
How to Rebuild your OBX Differential.
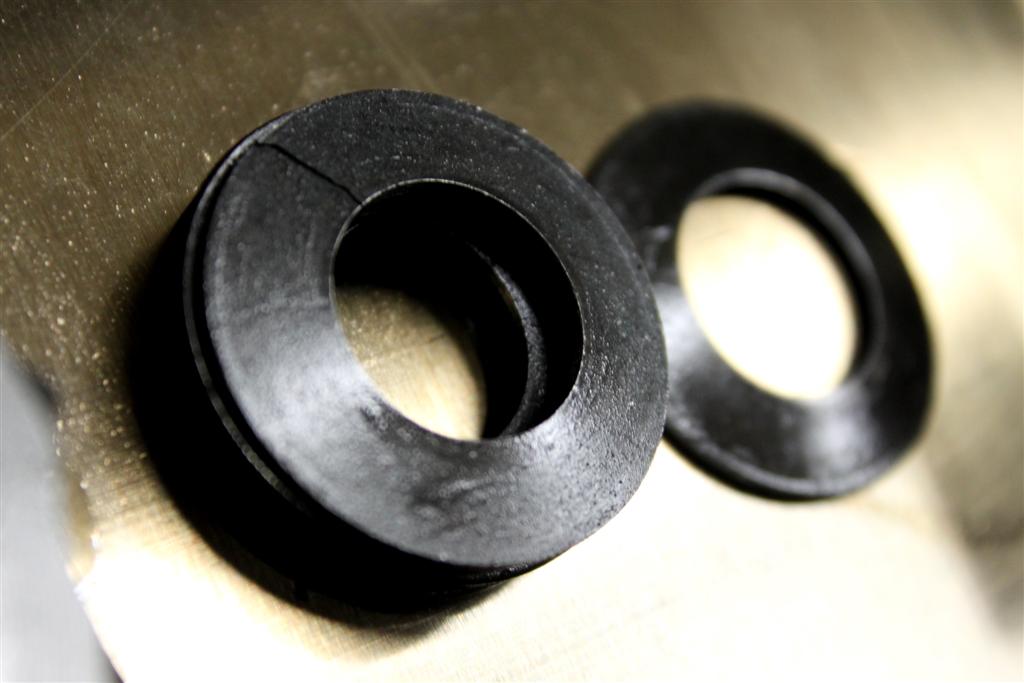
As we all know the belleville washers in the OBX diff seem to be cheap and prone to cracking. They won't stop the diff from working if they crack but they will no longer preload the axle and things are likely to be very noisy...
These washers really need to be replaced. When I say they are poor quality I mean it... I have heard of them arriving DOA cracked all the way through. I tested them with my 2lb sledge by smacking one of the originals and it broke on my first medium impact swing. I could even see the grain in the metal where it cracked! I tested a replacement by smacking it 10 times in a row with increasing force and only slightly bent it. There is a small gallary of broken washer pictures that customers have sent me at the bottom of this page. I will try to dig up some more pictures from over the years but only a few are required to see that they should be replaced....
Here is a step by step process for replacing OBX belleville washers:
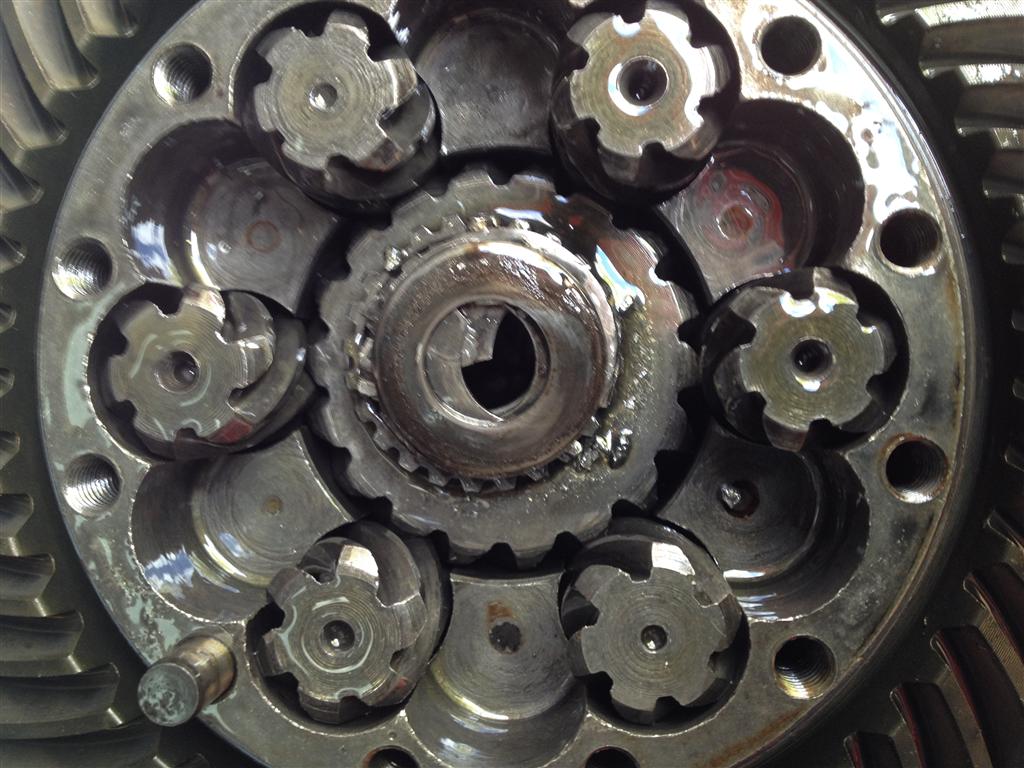
When disassembling the helical gears need to stay on their original side. They can be upside down but the top and bottom helical and sun gears are cut in opposite directions and must be installed in the correct positions. Just make sure to put everything in the way it came out and everything will be fine! :)
Note: FWD differentials have the gears in the opposite configuration as a RWD differential because they spin in the opposite direction!
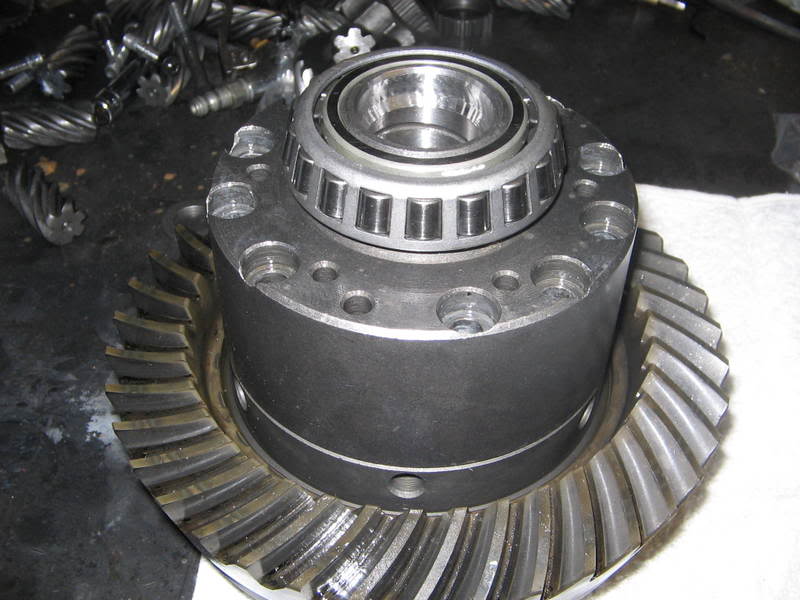
Here is a picture of the inside of the OBX with the upper worm gear, inner gears, and washers
disassembled:
.jpg)
Step 1: Place the thinner of the two gears inside the center retainer.
.jpg)
Step 2: Place the stacked washers inside of the gear. They should be stacked like this )()()(
.jpg)
.jpg)
Step 3: Place the thick gear over the washers (it will stick up past the top of the inner retainer if assembled properly to provide preload)
.jpg)
If you are talented you can put them all in at once. They will fit inside of the gears like this (notice the preload is there because the two gears are held apart by the belleville springs):
NOTE: Most Units come with equal width washer retainers but mine were different sizes (both work fine).
.jpg)
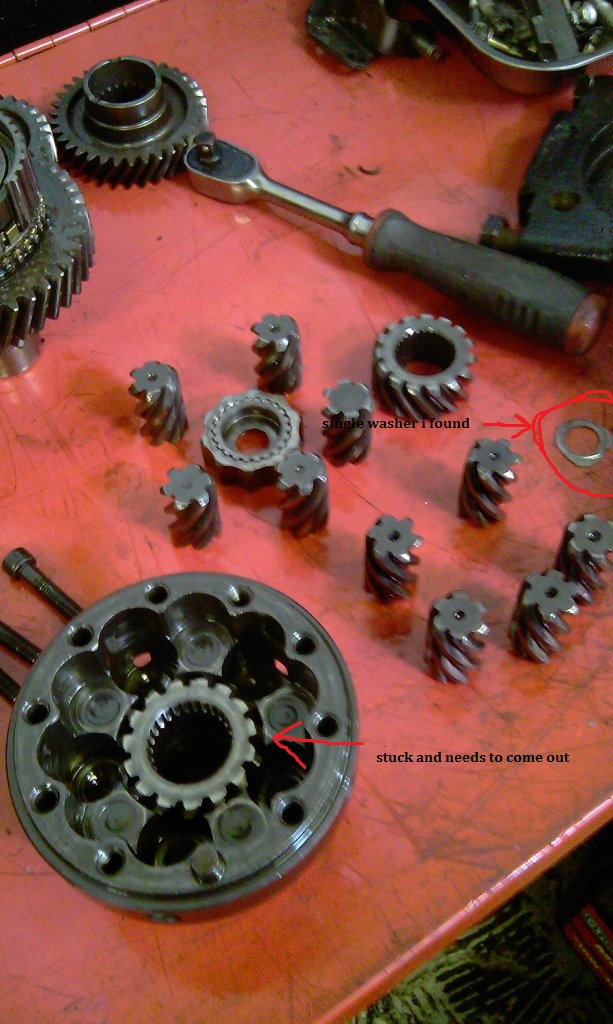
Step 4: Put the center worm gear back in.
.jpg)
Step 5: Put the top back on the diff
Note the dowl pin...
.jpg)
It aligns with this notch..
.jpg)
From the top it goes in the back side of the hole that is not like the others (around 5 o'clock in this picture)
.jpg)
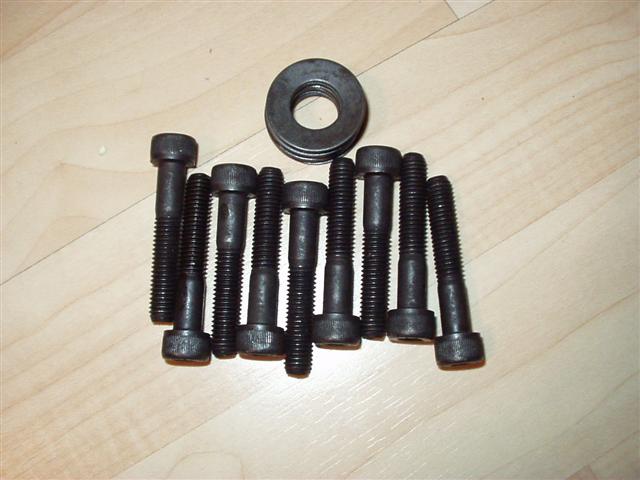
Step 6: Put the bolts in and torque them down to 28 ft*lbs
I also recommend using blue threadlocker (aka loctite) on them. I did see one person that had his LSD seperate and completely grenade on him due to the bolts loosening. Blue threadlocker will keep this from happening without risk of snapping off the bolts should the unit ever require disassembly. Red threadlocker might simply be too strong and risk bolt breakage on disassembly. There is no point in taking chances...
Some people have recommended tightening the M8 12.9 bolts tighter specs and some looser. I based my recommendation on a few sources:
Engineer's Handbook
Machinetoolhelp.com
dodgeram.org
dansmc.com
I suggest putting the diff in a vice. The side opposite the ring gear has a nice spot to clamp to on most of differentials. The Neon diff pictured can be held very securely this way.
Some people have experienced axle fitment problems after pressing on the differential bearings. This occurs because the differential housing is made of a softer metal than he stock diff. After the bearings are pressed on the holes are distorted. This can be solved by using a brake
cylinder hone to enlarge the hole slightly if the axles are too sung. I also found that if you try
a different clocking of the axle some fit looser than others. This should be fixed and remedied after the bearings are pressed on but before installing the diff into the tranny. I simply found a place where it fit loosely and installed the axle that way.
Checking Washer stack heights:
In general washers should be stacked )()()( , )()()), or )()() (listed from tallest to shortest configuration) depending on the washer stack height required by the differential's machining tolerances. The case should compress the washers between 25% and 75% from the time the bolts are loose until the case halves touch. Note: These turns are only until the halves touch, not until they are fully torqued.
The bolts move by 1.25mm per full turn because of their thread pitch.
As a general rule of thumb the optimal preload with the washers is 1/4 turn per compressed washer in the stack.
For 6 the washer configurations the acceptable number of turns is between .8 and 2.25 bolt turns with 1.5 being optimal. If more turns are required the stack height should be be reduced. Adding an aditional parallel washer does not change the turns required, adding an additoinal series washer will increase the optimal number of turns slightly.
For units that require 5 series washers reduce the number of turns to 1.33 because there are less washers to compress. For units that use 7 series washers increase the turns slightly to 1.75 turns because there are more washers to compress.
In some applications 7 or 8 washers are used but they should still be stacked in the series configuration shown above with parallel washers added as spacers when needed so that they can properly compress and give a good tolerance range. Stacking the washers in parallel eg: )))((( doesn't give enough compression range and it is not recommended.
In some cases OBX actualy varies the number of washers they use for a given application. This means that the kit may contain an extra washer that is not needed. If your kit comes with 6 washers and the OBX only comes with 5 in most cases the 6th washer is simply an extra and shouldn't be used unless the stack height is too short. I provide the extra washer just in case it is needed. In other cases their washers are non standard so I am forced to provide a different number in my replacement stack. For instace the BMW E36 kit comes with 7 washers instead of 8 to get the correct height. The important thing is to get the correct stack height for your differential.
I suggest always checking the preload of the washers in order to verify the correct stack height.. OBX's machining can vary a bit so it is very important to check the overall preload of the washers.
R200 Differential Only
There are now two versions of the R200 LSD. The new version has a taper on the case and uses 50mm bolts:
The older version is a flat cylinder shape and uses the 60mm bolts with the larger center washer fix:
R200 OBX LSDs have 12mm ring gear mounting holes and will need spacers if you use a ring gear that has 10mm threads such as an S30 or S130 ring gear.
These are a steel spacer that has a bronze coating. The coating makes no difference in this application.
![]()
R200 10mm to 12mm ring gear bolt spacers Add on (free shipping when ordering with a bolt/washer kit): $20
R200 10mm to 12mm ring gear bolt spacers (shipping is not included when ordering separately): $30
The Nissan Older R200 differential is an example where I completely changed the washer kit from what OBX provides. After trying a bunch of options and testing them I finalized on a kit that includes 8 small washers and 2 larger washers in the center that are used to hold everything in place. This is necessary because the R200 unit's retainers do not properly surround the stack and hold the washers in place. The center washers sit outside of the retainer and their larger cup holds the inner washers in place. OBX attempted to solve this with a strange and suboptimal stack configuration with many washers in parallel instead of changing the machining of the unit. In most cases only 7-8 of the outside washers should be used and should be stacked (()()()()) where the red washers are the larger center washers. The two outside yellow washers should be removed if the stack is too tall. This configuration solves the retainer issue and is working great on dozens of cars. Note that the center washers are stronger and therefore will not compress and are not counted in the number of turns required to compress the outer washers when calculating preload.
()()()()), ()()()()(, )()()()()(, etc...
(example stacks get taller from left to right)
Adding them in the same direction is fine and just means that the spacer washer won't compress adding them in the opposite direction is preferred instead of adding multiple parallel stacked washers.. There should be no reason to add more than two washers in the same direction to get the desired preload is also important to check that the gears were installed in the correct direction with these differentials.
The New R200 LSD does not require the 2 larger washer modification and should prove to be a better unit.
There is a good writeup on this on HybridZ: HybridZ R200 OBX LSD Rebuild Thread.
RWD differentials such as the R200 is that they can come with the helical gears reversed. The FWD helical direction needs to be the opposite of the RWD direction! I haven't heard of the FWD units coming backwards but the RWD versions sometimes do.... Here is another good thread comparing the OBX to the Quaife: R200 OBX LSD vs. Quaife
Let me know if you have questions or comments.
If you want/need a set of washers just choose the correct drop down for your application below or send me an email
to rich_bryant_is@yahoo.com and I can hook you up!.
Recently I heard that some suppliers are saying that "aftermarket washers are too strong to compress properly and shouldn't be used." In truth I have carefully selected the washers to have the correct strength.
The spring rate of steel is almost identical regardless of the alloy used. If the washers are made of steel (stainless, high carbon, chrome vandium, etc) then they all have a very close spring rate. The overall spring rate is then determined by the dimensions of the washer!
The washers I supply are slightly stronger but have no problem compressing as needed and have proven durability. If they were too strong I would have had complaints about wear and clamping problems and I would change them. With over 300 sets sold in the past 4 years I have yet to have someone report such a problem.
The problem with the stock washers is that they are brittle and break. This implies that they would actually be less flexible than a proper belleville with the same dimensions. As similar metals become stiffer they also become brittle. The originals are a poor quality washer plain and simple.
The bolts they are stamped as (and in most cases appear to be) 12.9 from OBX. I have actually seen pictures where an OBX LSD has been shipped with lower grade 8.8 bolts. OBX also has have poor quality control on their assembly and often overtorque and/or strip them so I suggest replacing them. If the bolts stretch it can cause real problems so why take the chance?
----------- Sales Section -----------
Complete OBX Rebuild Kits
I am offering washers along with new high quality 12.9 M8 bolts to replace
the originals. The bolts often come overtorqued and sometimes stripped out! I highly
recommend changing both of them while the diff is apart. I already have the information
for several applications.
If your specific application is not in the dropdown lists just
email me for more information. There are slight variations in the kits so I will need
measurements from the washers and bolts to ensure that the correct parts are included.
Once I have those measurements I will add them to the dropdowns for automated ordering.
FWD, RWD, AWD, and MR Drive OBX Bolt/Washer Kits:
All Kits marked NEW will require measurements
The first person to order a kit and provide measurements will recieve a $15 refund.
Note: In some cases OBX provides slightly different bolt lengths in their differentials with no other design changes. In some cases they have even changed to longer or shorter bolt lengths on the same application.
As an example, There is now a new version of the Honda LSD9000 that requires 35mm bolts (35mm bolts will also work with the older 40mm bolt version)
All of the bolts that I provide have been tested to make sure they are not too long or two short for the given platform.
If there are any problems simply contact me and I will make it right.
Bolt/Washer Rebuild Kit with shipping to the USA ($40 shipped
Priority Mail):
Bolt/Washer Rebuild Kit with shipping to Canada ($53 shipped First Class Mail):
Recent USPS shipping changes no longer allow rigid objects to be shipped via first class envelope to comply with internatinal shipping union rules. They must now be shipped as packages which increases costs significantly.
Bolt/Washer Rebuild Kit with shipping to Canada ($59 shipped Priority Mail):
Bolt/Washer Rebuild Kit with International shipping via First Class Mail ($58 shipped First Class Mail)
Recent USPS shipping changes no longer allow rigid objects to be shipped via first class envelope to comply with internatinal shipping union rules. They must now be shipped as packages which increases costs significantly.
Bolt/Washer Rebuild Kit with International shipping via Priority Mail ($64 shipped
Priority Mail International):
Recent USPS shipping changes no longer allow rigid objects to be shipped via first class envelope to comply with internatinal shipping union rules. They must now be shipped as packages which increases costs significantly.
Washer Only Kits
All Washers marked NEW will require measurements
The first person to order washers marked as new will recieve a $7 refund.
For those that prefer only the washers I am also selling them without the bolts
Shipping of only washers outside of the US/Canada would be not worth skipping the bolts.
Washers with shipping to the USA ($33 shipped via Priority Mail):
Washers with shipping to Canada($36 shipped First Class Mail):
Recent USPS shipping changes no longer allow rigid objects to be shipped via first class envelope to comply with internatinal shipping union rules. They must now be shipped as packages which increases costs significantly.
Rich's OBX Install Tips:
After you have the bearings pressed the axle holes sometimes distort slightly and need to have about .005 honed out of them. I used a 3/4 inch wheel cylinder hone to open up my axle holes a bit so that the axles will fit. This is MUCH cheaper than hiring a machine shop to do the same work (machine shops charge often $50 or more for this). Several such hones are available on Amazon such as: Powerbuilt 648401, Lisle 10000, AMPRO T7179.
Also make sure that your case halves are fully centered. On some models the dowel pins don't do a great job of centering the case halves so care must be taken to get them aligned when torquing the bolts.
My axles were too tight from the start because the axle holes had too little clearance. I had them machined before I started and then they shrunk agian when the bearings were installed... I was able to turn my axle relative to the diff until I found a clocking that allowed it to slip in but it was annoying so I took the diff back out and honed it for more clearance.
The moral of the story is to check the axle fitment after the bearings are pressed on but before the diff is installed in the transmission!
More than 800 people have now used my replacement washers in Audi, BMW, Dodge, GM, Ford, Honda, Hyundai, Mazda, Mini, Mitsubishi, Nissan, VW, Subaru, Toyota and other cars!
Additional Turbododge OBX Info
Home
Thanks,
Rich
Gallary of Original OBX Supplied Washer Carnage (this clearly shows that the originals are the weak link).
These were used for a while:
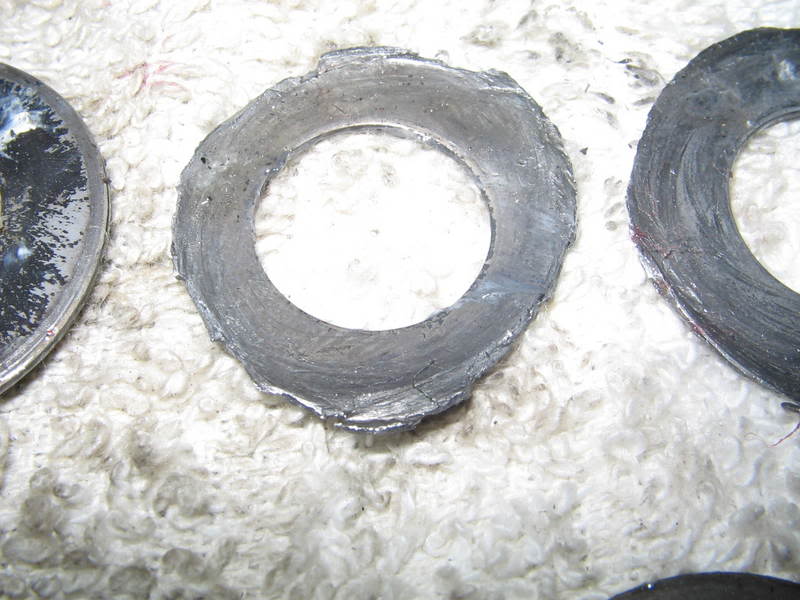
These were found DOA when the OBX LSD was opened for inspection before install (I have heard of many such cases)...
Here is a Honda H22 OBX LSD where the original washers were used for 3k miles on a 600hp/470ft*lb engine.
Only one of the original 6 washers (pictured at 3:00) was found and the others were reduced to flakes inside of the transmission case...
Additionally one of the sun gears was lodged in the case and the diff started to act like a spool...

If you have more pictures send them my way and I will post them.
